Building Terminal User Interfaces (TUI) in Python

A Terminal User Interface (TUI) is a user interface that allows users to interact with a computer program using a text-based interface. TUI is a powerful way to create interactive applications that run in the terminal. In this post, we will explore why creating a TUI is beneficial, provide a list of possible options, introduce the Textual library in Python, and give a quick example of how to build a TUI.
Why create a Terminal User Interface (TUI)?
A TUI is beneficial when the user input is limited and the program requires a simple interface. TUI provides a better user experience than a pure command-line interface. Users can interact with the program using buttons, check-boxes, and other graphical elements that are not available in a pure command-line interface. TUI is also easier to implement than a full-fledged GUI.
A List of Possible Options
There are many options available for creating TUI applications in Python. Some popular options include:
- Textual: a Python library for creating TUI applications
- urwid: a popular TUI library for Python
- npyscreen: a Python library for creating TUI applications with forms and grids
- blessings: a Python library for styling text-based interfaces
Introduction to Textual
Textual is a Rapid Application Development framework for Python, built by Textualize.io and it can be used for creating TUI applications. It provides a simple API for creating buttons, check-boxes, text fields, and other graphical elements. Textual also supports mouse input and keyboard shortcuts. It is open source, cross platform and with low resource requirements. Textual apps can run over ssh on remote machines (like servers).
Another interesting feature is that it uses CSS for styling, so if you have web design background, it can be pretty convenient.
Extending Free Fall Application
In our CLI post we created a command line application where the user defines the acceleration due to gravity, and the initial height of dropping an object. The application responded with the duration of the fall in seconds.
In this post, we will extend that application with a Terminal User Interface.
Importing The Modules
Initially, we import all the required modules.
# For our computations
from math import sqrt

from textual.app import (
	App,  # The main App
	ComposeResult,  # For type-hint
	Binding  # Binding events with actions
)

# A Generic Container
from textual.containers import Container

from textual.widgets import (
	Header,  # Manage App header
	Footer,  # Manage App Footer
	Static, Input, Button  # Form Components
)
The main App Class
Next we create the FreeFallApp class which inherits from App and represents our main application. There are some members of the app to be defined, like:
-
CSS_PATH: The CSS file with styling information. -
TITLE: The application title. -
BINDINGS: A list with tuples orBindingobjects that defines the trigger and the respective action.
class FreeFallApp(App):
    CSS_PATH = "freefall.css"
    TITLE = "Free Fall Solver"
    BINDINGS = [
        ("d", "toggle_dark", "Toggle dark mode"),
        ("q", "quit", "Exit the application"),
        Binding("tab", "focus_next", "Focus Next", show=False),
        Binding("escape", "focus_none", "Set Focus to None", show=False),
    ]
The show flag defines the visibility of the action on the footer.
Designing the layout
In order to define the layout, we need to define the compose method.
    def compose(self) -> ComposeResult:
        yield Header(show_clock=False)  # Create the app header

		# A main container which includes the layout
        yield Container(
            Static("Setup", classes="header"),  # A static text
	    	# Another container with two inputs
            Container(
	    		# The inputs have a placeholder text
				# their ID and CSS-class
                Input(placeholder="Gravity (9.81)",
                      id="gravity", classes="input"),
                Input(placeholder="Initial Height (1)",
                      id="height", classes="input"),
                classes="horizontal"  # The container class
            ),
	    	# A button
            Button("Solve", id="solve", classes="solve"),
	    	# Another horizontal container for the results
            Container(
                Static("Results", classes="header"),  # A static text
                Container(
                    Static("The Fall Duration is ", classes="results-label"),
                    Static(id="results", classes="results-text"),
                    classes="horizontal"
                ),
                classes="vertical"
            ),
            id="main",  # The main container ID
            classes="vertical"  # The main container CSS-class
        )

        yield Footer()  # Create the app footer
The respective CSS file is freefall.css:
#main {
    width: 100;
    text-align: center;
}

.header {
    padding-top: 1;
    text-align: center;
    width: 100%;
}

.input {
    margin-top: 1;
    width: 49;
}

.results-label {
    margin-top: 1;
    width: 50%;
    text-align: right;
}

.results-text {
    margin-top: 1;
    width: 50%;
    text-align: left;
}

.solve {
    margin-top: 1;
    margin-left: 40;
    text-align: center;
    width: 20;
}

.horizontal {
    layout: horizontal;
    height: auto;
}

.vertical {
    layout: vertical;
    height: auto;
}
In case you did not have used CSS before, the dot notation refers to objects with specific class while the hash refers to the ID. For example:
-
#mainmeans “The object with id = “main”. -
.result-labelmeans “The object with class=”result-label”.
The callback function
Next, we define the function to be called when the user presses the solve button:
    def solveFreeFall(self) -> float:
		# Get the value of the element with id=gravity
        g = self.query_one("#gravity").value
		# Get the value of the element with id=height
        h = self.query_one("#height").value

		# If no values are available, fallback to defaults
        g = float(g) if g else 9.81
        h = float(h) if h else 1

        return sqrt(2 * h / g)
Getting the button event
We need to know when to call the solveFreeFall(). There is a method to be defined which will be triggered whenever a button is being pressed. Then, we can identify which button is pressed and act accordingly:
    def on_button_pressed(self, event: Button.Pressed) -> None:
        """Event handler called when a button is pressed."""
        if event.button.id == "solve":  # Check the id of the button
            t = self.solveFreeFall()  # Call the callback
            res = self.query_one("#results")  # Get the results object
            res.update(f" {t:.2f} seconds")  # Update the value with the new one
Toggle theme
Finally, let’s implement the function to be called when the user presses d. We defined the action to be triggered as toggle_dark. Now we define that action as follows:
    def action_toggle_dark(self) -> None:
        self.dark = not self.dark
Putting it all together
Our final code in freefall_tui.py is:
from math import sqrt

from textual.app import App, ComposeResult, Binding
from textual.containers import Container
from textual.widgets import Header, Footer, Static, Input, Button


class FreeFallApp(App):
    CSS_PATH = "freefall.css"
    TITLE = "Free Fall Solver"
    BINDINGS = [
        ("d", "toggle_dark", "Toggle dark mode"),
        ("q", "quit", "Exit the application"),
        Binding("tab", "focus_next", "Focus Next", show=False),
        Binding("escape", "focus_none", "Set Focus to None", show=False),
    ]

    def compose(self) -> ComposeResult:
        yield Header(show_clock=False)

        yield Container(
            Static("Setup", classes="header"),
            Container(
                Input(placeholder="Gravity (9.81)",
                      id="gravity", classes="input"),
                Input(placeholder="Initial Height (1)",
                      id="height", classes="input"),
                classes="horizontal"
            ),
            Button("Solve", id="solve", classes="solve"),
            Container(
                Static("Results", classes="header"),
                Container(
                    Static("The Fall Duration is ", classes="results-label"),
                    Static(id="results", classes="results-text"),
                    classes="horizontal"
                ),
                classes="vertical"
            ),
            id="main",
            classes="vertical"
        )

        yield Footer()

    def action_toggle_dark(self) -> None:
        self.dark = not self.dark

    def solveFreeFall(self) -> float:
        g = self.query_one("#gravity").value
        h = self.query_one("#height").value

        g = float(g) if g else 9.81
        h = float(h) if h else 1

        return sqrt(2 * h / g)

    def on_button_pressed(self, event: Button.Pressed) -> None:
        """Event handler called when a button is pressed."""
        if event.button.id == "solve":
            t = self.solveFreeFall()
            res = self.query_one("#results")
            res.update(f" {t:.2f} seconds")


if __name__ == "__main__":
    app = FreeFallApp()
    app.run()
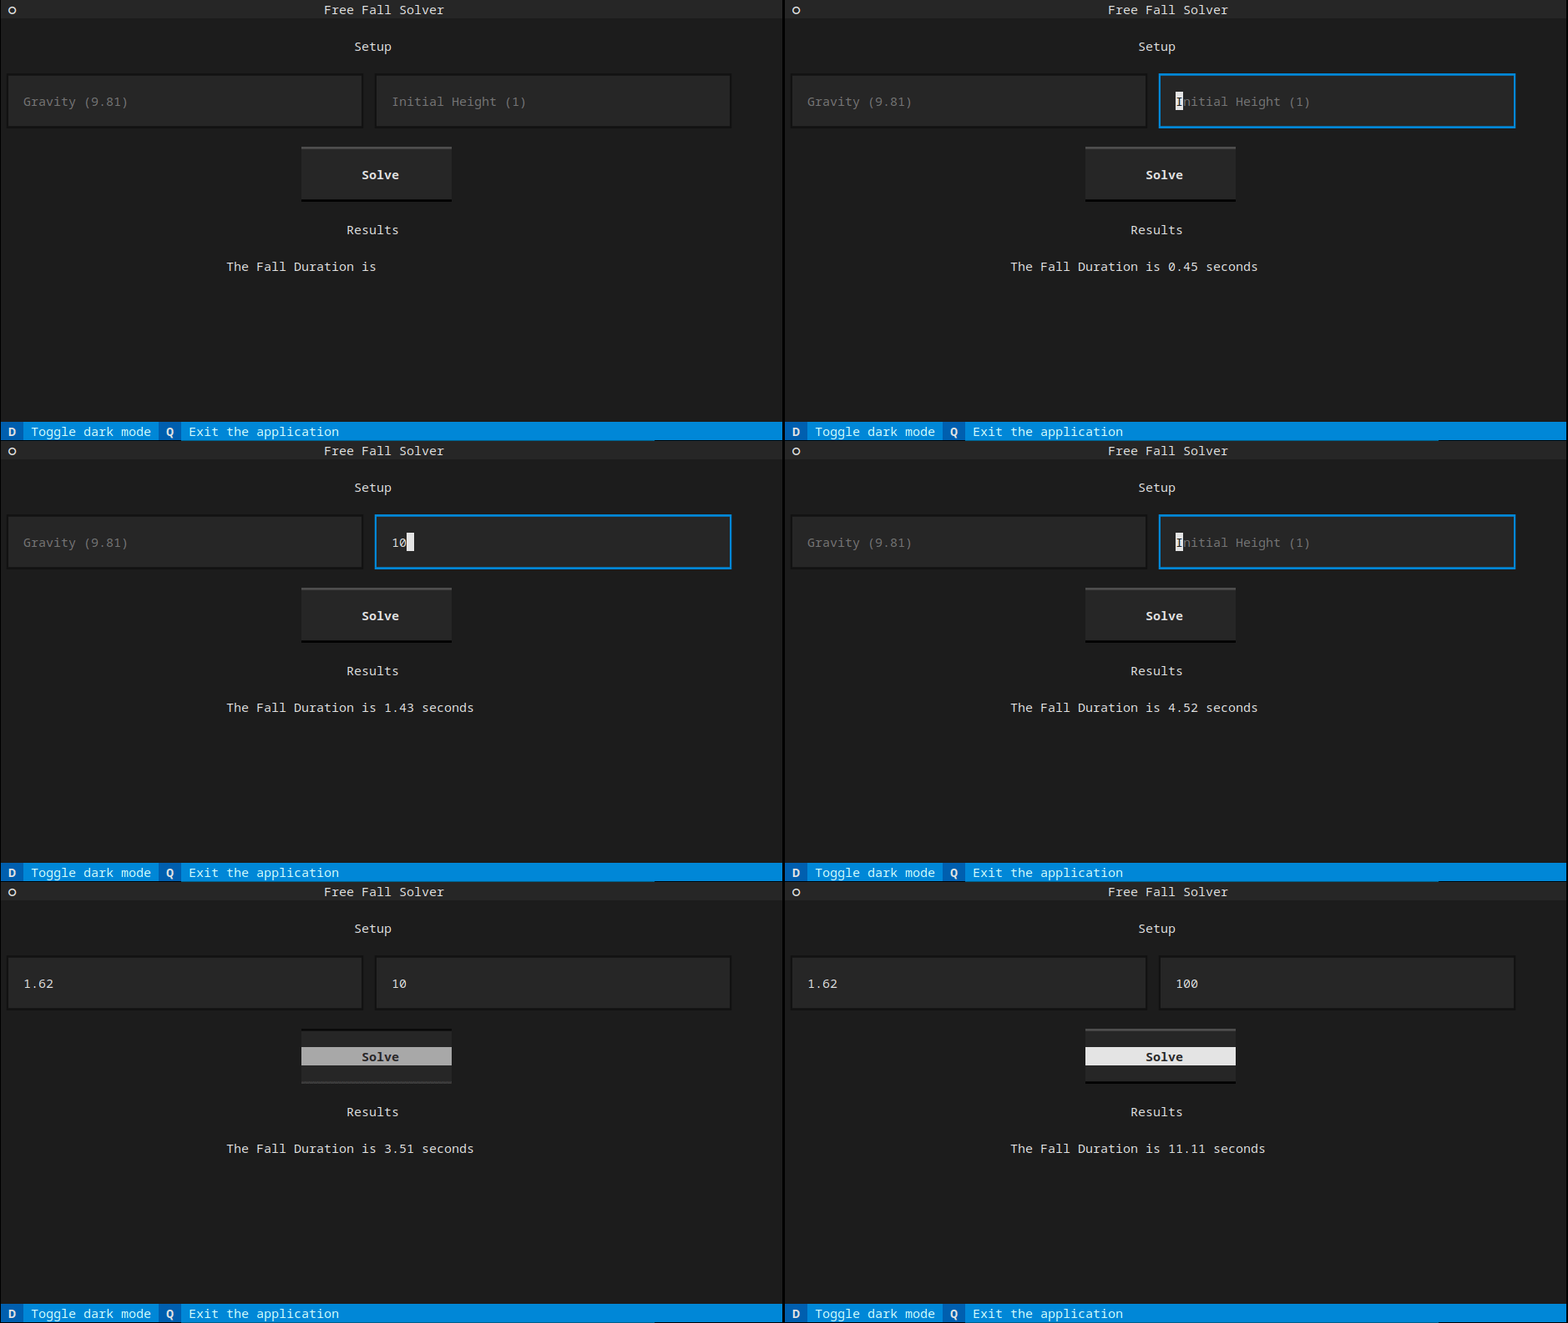
And when we run our application, we get the following result:

In conclusion, TUI is a powerful way to create interactive applications that run in the terminal. Textual provides a simple API for creating TUI applications in Python. By using Textual, developers can quickly create TUI applications without the need for a full-fledged GUI. To learn more about Textual, I recommend to study the official documentation.
